Getting a flavorful, healthy dinner on the table during busy weeknights can feel nearly impossible. Between work deadlines, after-school activities, and everything else life throws at you, the last thing you want is to spend hours in the kitchen preparing an elaborate meal that requires a million ingredients.
That’s exactly why this baked lemon chicken is such a lifesaver: it comes together with just a handful of simple ingredients, takes minimal effort to prepare, and delivers a bright, tangy flavor that the whole family will actually enjoy eating.

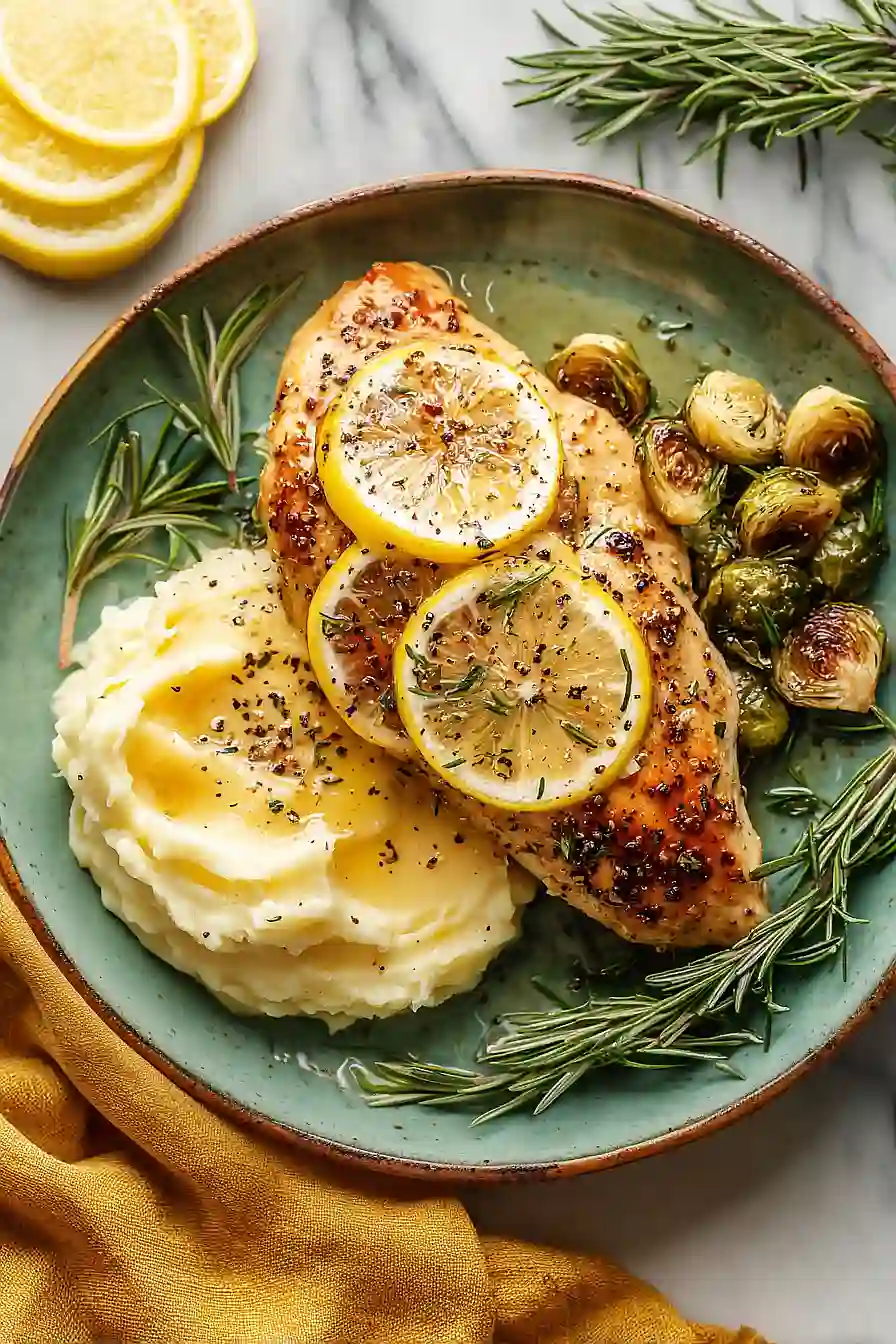
Why You’ll Love This Baked Lemon Chicken
- Quick weeknight dinner – Ready in just 30-45 minutes, this recipe is perfect for busy evenings when you need something delicious on the table fast.
- Simple ingredients – You probably have most of these pantry staples on hand already, like butter, garlic, and lemon juice.
- Bright, fresh flavors – The lemon and honey create a tangy-sweet sauce that keeps the chicken moist and flavorful without being heavy.
- Healthy and light – Using lean chicken breast and fresh ingredients, this is a nutritious meal that won’t weigh you down.
- Easy cleanup – Everything bakes together in one pan, which means less time scrubbing dishes and more time enjoying your meal.
What Kind of Chicken Should I Use?
Boneless, skinless chicken breasts are the star of this recipe, and you’ve got some flexibility with what you buy. You can use fresh or frozen chicken breasts – just make sure frozen ones are fully thawed before cooking so they bake evenly. If your chicken breasts are on the thicker side (over an inch thick), consider pounding them to an even thickness or slicing them horizontally so they cook through at the same rate. Some stores sell “thin-sliced” chicken breasts which are perfect for this recipe since they’ll cook faster and soak up all that lemony goodness.
Options for Substitutions
This recipe is pretty straightforward, but here are some swaps you can make if needed:
- Chicken breasts: Boneless, skinless chicken thighs work great here and actually stay more moist during baking. You can also use bone-in chicken pieces, just add about 10-15 minutes to the cooking time.
- Butter: Olive oil is a fine substitute if you’re out of butter or want a lighter option. Use the same amount and the sauce will still turn out tasty.
- Fresh lemon juice: Bottled lemon juice can work in a pinch, though fresh really does taste better. You could also try lime juice for a slightly different citrus flavor.
- Chicken broth: Vegetable broth or even white wine will do the job. If using wine, you might want to add a splash more to account for the cooking-off process.
- Italian seasoning: Don’t have Italian seasoning? Mix together equal parts dried basil, oregano, and thyme. Or just use whatever dried herbs you have on hand – it’ll still be delicious.
- Honey: Maple syrup or a pinch of sugar works just as well to balance out the tartness of the lemon.
Watch Out for These Mistakes While Baking
The biggest mistake when making baked lemon chicken is skipping the browning step in the skillet, which creates a golden crust and locks in flavor that you just can’t get from baking alone.
Another common error is not basting the chicken with the lemon sauce throughout baking – those spoonfuls of sauce every 5-10 minutes keep the chicken moist and build up a delicious glaze, so set a timer to remind yourself.
Overcooking is easy with lean chicken breasts, so pull them out when an instant-read thermometer hits 155°F in the thickest part, as they’ll continue cooking while resting and reach a safe 165°F without drying out.
Finally, don’t pour the sauce over the chicken too early before baking – wait until it’s in the pan so the honey and lemon mixture doesn’t burn on your stovetop.

What to Serve With Baked Lemon Chicken?
This bright, lemony chicken pairs really well with simple sides that won’t compete with its flavors. I love serving it over fluffy white rice or creamy mashed potatoes, which soak up all that delicious lemon butter sauce. Roasted vegetables like asparagus, green beans, or Brussels sprouts are perfect alongside this dish, or you could go with a light Caesar salad to keep things fresh. For a heartier meal, try it with garlic bread or buttered egg noodles that you can toss with some of the pan sauce.
Storage Instructions
Store: Keep your leftover baked lemon chicken in an airtight container in the fridge for up to 4 days. I like to store the chicken with some of that delicious lemony sauce drizzled over it so it stays moist and flavorful.
Freeze: This chicken freezes really well for up to 3 months. Let it cool completely, then store it in a freezer-safe container or bag with the sauce. I sometimes slice it before freezing so I can grab just what I need for salads or wraps.
Reheat: Warm it up gently in the microwave on medium power, or heat it in a covered dish in the oven at 350°F until warmed through. If you’re reheating from frozen, let it thaw in the fridge overnight first for the best results.
| Preparation Time | 10-15 minutes |
| Cooking Time | 20-30 minutes |
| Total Time | 30-45 minutes |
| Level of Difficulty | Easy |
| Servings | 4 servings |
Estimated Nutrition
Estimated nutrition for the whole recipe (without optional ingredients):
- Calories: 900-1050
- Protein: 110-125 g
- Fat: 40-50 g
- Carbohydrates: 13-17 g
Ingredients
For the chicken:
- 4 chicken breasts
- 3 tbsp unsalted butter
For the sauce:
- 1/2 cup chicken broth
- 4 tbsp lemon juice
- 1 tbsp honey
- 1 tsp cornstarch (to thicken glaze)
- 1 tbsp minced garlic
- 1 tsp italian seasoning
- 1 tsp salt
- 1/2 tsp cracked black pepper
Step 1: Prepare Your Mise en Place and Preheat
- 4 chicken breasts
- 1 tbsp minced garlic
- 1/2 cup chicken broth
- 4 tbsp lemon juice
- 1 tbsp honey
- 1 tsp italian seasoning
- 1 tsp salt
- 1/2 tsp cracked black pepper
Preheat your oven to 400°F and lightly grease a 9×13 inch baking dish or similar size.
While the oven heats, mince your garlic and measure out all your liquids and spices into a small bowl—this keeps you organized and ready to move quickly once the chicken hits the pan.
Pat your chicken breasts dry with paper towels; this is crucial for getting a good sear and helps the skin brown evenly.
Step 2: Sear the Chicken for Golden Color
- 4 chicken breasts
- 2 tbsp unsalted butter
Heat 2 tablespoons of butter in a large skillet over medium-high heat until it foams and just starts to turn golden.
Once it’s hot, carefully place the chicken breasts in the pan and sear for 2-3 minutes per side until they develop a golden-brown crust.
This step builds flavor through browning and helps keep the chicken juicy inside.
Don’t worry if they’re not cooked through—they’ll finish in the oven.
Step 3: Transfer Chicken and Build the Sauce
- 1 tbsp unsalted butter
- 1 tsp cornstarch
- 1/2 cup chicken broth
- 4 tbsp lemon juice
- 1 tbsp honey
- 1 tbsp minced garlic
- 1 tsp italian seasoning
- 1 tsp salt
- 1/2 tsp cracked black pepper
Transfer the seared chicken breasts to your prepared baking dish.
In the same skillet (don’t clean it—those browned bits add flavor), melt the remaining 1 tablespoon of butter over medium heat.
Whisk together the cornstarch with 1 tablespoon of the chicken broth to create a slurry, then add it along with all your measured liquids and seasonings.
Stir constantly for about 1 minute until the sauce becomes slightly thickened and glossy.
I find this pre-thickening step helps the glaze cling to the chicken better during baking.
Step 4: Bake and Baste for Maximum Flavor
- sauce from Step 3
Pour the sauce from Step 3 over the seared chicken breasts in the baking dish.
Place in your preheated 400°F oven and bake for 20-30 minutes, basting (spooning the sauce over the chicken) every 5-10 minutes.
This basting technique keeps the chicken moist and ensures the lemon-honey glaze builds up beautifully.
The chicken is done when it reaches an internal temperature of 165°F at the thickest part.
Step 5: Rest and Serve
Remove the baking dish from the oven and let the chicken rest for 3-5 minutes before serving.
I always let chicken rest for a few minutes after cooking—it helps retain all those delicious juices so every bite stays tender and moist.
Spoon the accumulated pan sauce over each portion and serve hot.
Simple Baked Lemon Chicken
Ingredients
Method
- Preheat your oven to 400°F and lightly grease a 9x13 inch baking dish or similar size. While the oven heats, mince your garlic and measure out all your liquids and spices into a small bowl—this keeps you organized and ready to move quickly once the chicken hits the pan. Pat your chicken breasts dry with paper towels; this is crucial for getting a good sear and helps the skin brown evenly.
- Heat 2 tablespoons of butter in a large skillet over medium-high heat until it foams and just starts to turn golden. Once it's hot, carefully place the chicken breasts in the pan and sear for 2-3 minutes per side until they develop a golden-brown crust. This step builds flavor through browning and helps keep the chicken juicy inside. Don't worry if they're not cooked through—they'll finish in the oven.
- Transfer the seared chicken breasts to your prepared baking dish. In the same skillet (don't clean it—those browned bits add flavor), melt the remaining 1 tablespoon of butter over medium heat. Whisk together the cornstarch with 1 tablespoon of the chicken broth to create a slurry, then add it along with all your measured liquids and seasonings. Stir constantly for about 1 minute until the sauce becomes slightly thickened and glossy. I find this pre-thickening step helps the glaze cling to the chicken better during baking.
- Pour the sauce from Step 3 over the seared chicken breasts in the baking dish. Place in your preheated 400°F oven and bake for 20-30 minutes, basting (spooning the sauce over the chicken) every 5-10 minutes. This basting technique keeps the chicken moist and ensures the lemon-honey glaze builds up beautifully. The chicken is done when it reaches an internal temperature of 165°F at the thickest part.
- Remove the baking dish from the oven and let the chicken rest for 3-5 minutes before serving. I always let chicken rest for a few minutes after cooking—it helps retain all those delicious juices so every bite stays tender and moist. Spoon the accumulated pan sauce over each portion and serve hot.