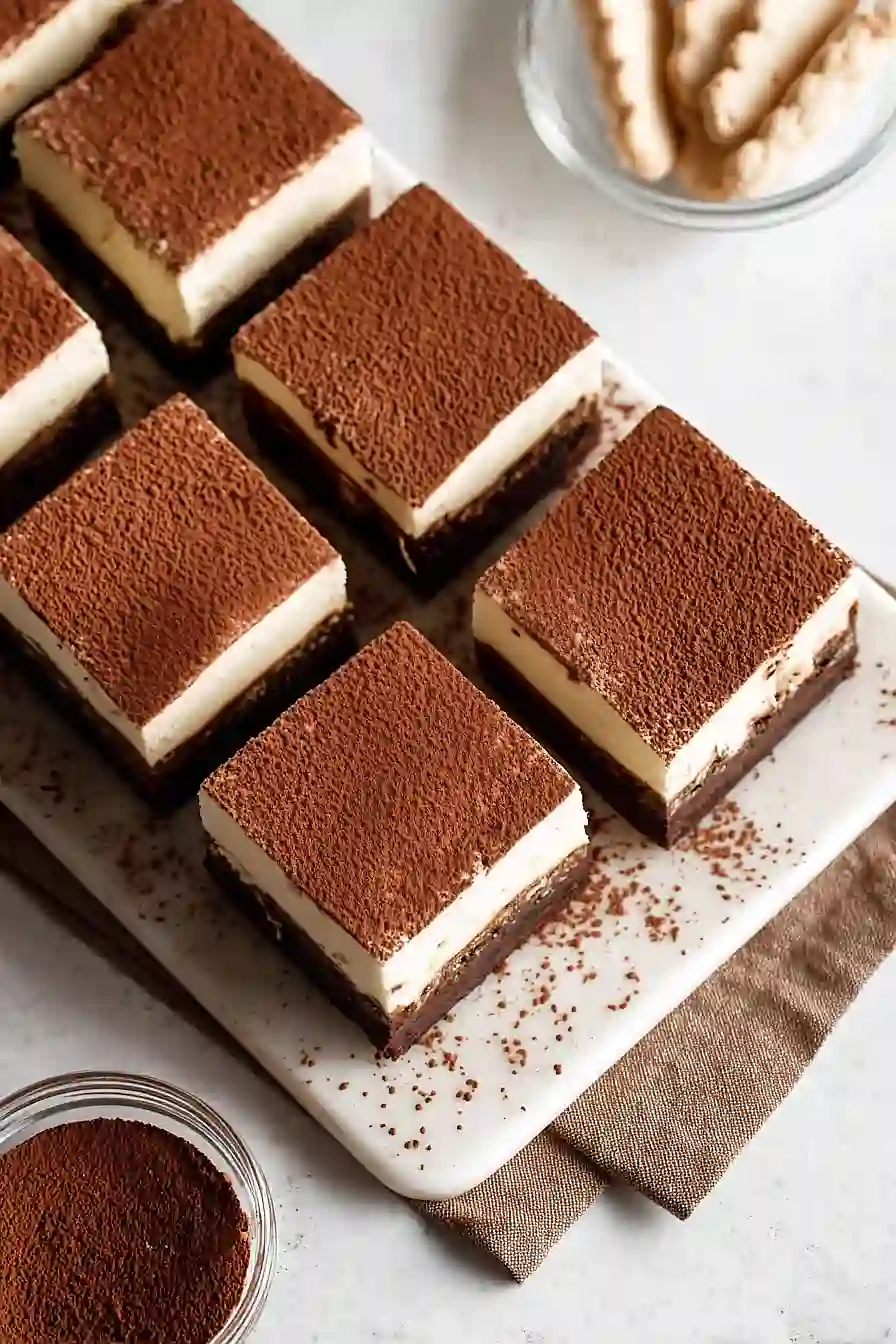
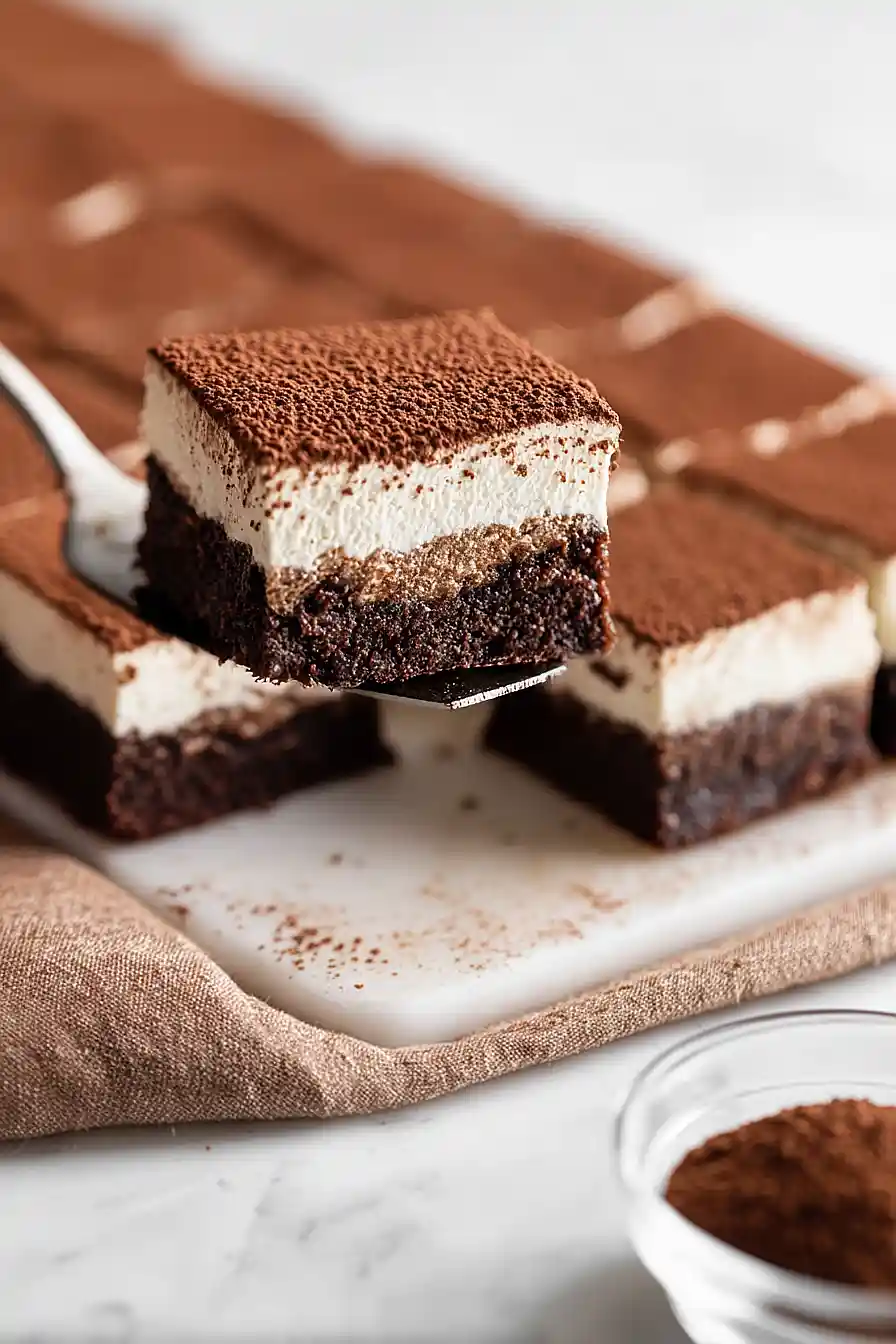
If you ask me, tiramisu and brownies are two of the best desserts out there.
This recipe brings them together in one pan, combining rich, fudgy chocolate brownies with the coffee-soaked, creamy goodness of classic tiramisu. The brownies get a double shot of espresso powder for that signature coffee kick, while espresso-dipped ladyfingers add an authentic Italian touch.
They’re topped with a smooth mascarpone cream that’s sweet, light, and just what these brownies need. A dusting of cocoa powder finishes the whole thing off.
It’s a dessert that looks fancy but comes together easier than you’d think, perfect for when you want to impress without spending all day in the kitchen.
Why You’ll Love These Tiramisu Brownies
- Two desserts in one – You get the fudgy richness of brownies combined with the creamy, coffee-soaked layers of tiramisu, giving you the best of both worlds in every bite.
- Impressive presentation – These brownies look fancy enough for special occasions or dinner parties, but they’re easier to make than traditional tiramisu since you skip the fussy assembly.
- Rich coffee flavor – The espresso powder in both the brownie base and the soaking liquid gives you that authentic tiramisu taste that coffee lovers crave.
- Make-ahead friendly – You can prepare these a day in advance, which actually makes them taste even better as the flavors meld together in the fridge.
What Kind of Chocolate Should I Use?
For these tiramisu brownies, you’ll want to use good quality chocolate since it’s a main flavor component. Semi-sweet or bittersweet chocolate works best here, as they provide a rich chocolate taste without being too sweet when combined with all the other ingredients. You can use chocolate chips in a pinch, but bar chocolate that you chop yourself tends to melt more smoothly and gives you a better texture. Avoid using milk chocolate for this recipe since it’s too sweet and won’t give you that deep, grown-up chocolate flavor that pairs so well with the espresso and mascarpone layers.

Options for Substitutions
While some ingredients are pretty essential here, you do have some wiggle room for substitutions:
- Espresso powder: If you don’t have espresso powder, you can use very finely ground instant coffee. Use the same amount, though the flavor will be slightly less intense.
- Chocolate: Semi-sweet or bittersweet chocolate both work great. You can also use chocolate chips if that’s what you have, though bar chocolate melts more smoothly.
- Mascarpone: This one’s tricky – mascarpone gives tiramisu its signature taste, so I’d recommend not substituting it if possible. In a pinch, you could mix 8 oz cream cheese with 1/4 cup heavy cream, but the flavor won’t be quite the same.
- Lady fingers: These are pretty important for the tiramisu layer, but if you can’t find them, you could use soft sponge cake cut into strips. Just make sure whatever you use can soak up the coffee mixture without falling apart.
- Butter: You can swap this with coconut oil for a dairy-free brownie base, though it will add a slight coconut flavor.
- Heavy cream: Make sure to use heavy whipping cream here – it needs to whip up properly for the topping. Light cream or half-and-half won’t work.
Watch Out for These Mistakes While Baking
The biggest mistake when making tiramisu brownies is overbaking the brownie layer, which creates a dry base instead of the fudgy texture you want – pull them out when a toothpick comes out with a few moist crumbs, not completely clean.
Another common error is soaking the lady fingers for too long in the coffee mixture, as anything more than a quick one-second dip will turn them mushy and cause them to fall apart when you try to arrange them on the brownies.
When whipping the mascarpone cream, be careful not to overbeat it once you add the heavy cream, since going past stiff peaks can cause the mixture to separate and become grainy instead of smooth and spreadable.
Finally, don’t skip the chilling time – that full hour in the fridge is what allows all the layers to set properly and makes cutting clean squares much easier.
What to Serve With Tiramisu Brownies?
These brownies are pretty rich and decadent on their own, so I like to keep things simple when serving them. A hot cup of espresso or strong coffee is the perfect pairing since it echoes the coffee flavors already in the brownies and cuts through the sweetness. If you’re serving these at a dinner party, they’re great alongside some fresh berries like raspberries or strawberries, which add a nice tart contrast to the creamy mascarpone topping. For an extra indulgent dessert, you can add a scoop of vanilla ice cream on the side, though honestly, these brownies are so good they don’t need much else.
Storage Instructions
Store: Keep your tiramisu brownies covered in the fridge since they have that creamy mascarpone topping. They’ll stay fresh for about 3-4 days in an airtight container. The brownies actually taste even better the next day once all those coffee and cream flavors have had time to meld together.
Freeze: You can freeze these brownies for up to 2 months, though the mascarpone topping might change texture slightly when thawed. I’d recommend freezing them in individual portions wrapped in plastic wrap, then placed in a freezer bag so you can grab just what you need.
Serve: These are best enjoyed cold straight from the fridge. Let them sit out for about 5-10 minutes before serving if you prefer them less chilled. If you froze them, thaw overnight in the refrigerator and dust with a fresh layer of cocoa powder before serving for that classic tiramisu look.
| Preparation Time | 30-40 minutes |
| Cooking Time | 30-40 minutes |
| Total Time | 210-240 minutes |
| Level of Difficulty | Medium |
| Servings | 16 pieces |
Estimated Nutrition
Estimated nutrition for the whole recipe (without optional ingredients):
- Calories: 3600-4000
- Protein: 40-50 g
- Fat: 230-260 g
- Carbohydrates: 370-410 g
Ingredients
For the brownies:
- 1/2 cup butter
- 7 oz semi-sweet chocolate
- 1 tbsp espresso powder
- 1 1/4 cups sugar
- 3 eggs
- 1 tsp vanilla extract
- 3 tbsp vegetable oil
- 2/3 cup cocoa powder
- 1/4 tsp salt
- 1/2 cup flour
For the soak and middle layer:
- 2/3 cup water
- 1.5 tbsp espresso powder
- 1 tbsp sugar
- 12 ladyfingers
For the topping:
- 9 oz cold mascarpone cheese
- 1/2 cup powdered sugar
- 1.5 tsp vanilla extract
- 1 1/4 cups heavy cream
- 1 tbsp cocoa powder
Step 1: Prepare the Pan and Make the Espresso Dip
- 2/3 cup water
- 1.5 tbsp espresso powder
- 1 tbsp sugar
Preheat your oven to 350°F and line an 8×8 or 9×9 inch baking pan with parchment paper.
While the oven heats, prepare the espresso dipping liquid by combining 2/3 cup boiling water, 1.5 tablespoons espresso powder, and 1 tablespoon sugar in a small bowl, stirring until the espresso and sugar dissolve completely.
Set aside to cool to room temperature—this needs to be cool before dipping the ladyfingers or they’ll fall apart.
Step 2: Make the Brownie Batter
- 1/2 cup butter
- 7 oz semi-sweet chocolate
- 1 tbsp espresso powder
- 1 1/4 cups sugar
- 3 eggs
- 1 tsp vanilla extract
- 3 tbsp vegetable oil
- 2/3 cup cocoa powder
- 1/4 tsp salt
- 1/2 cup flour
Melt 1/2 cup butter in a pot over medium heat, then add 7 oz semi-sweet chocolate and 1 tablespoon espresso powder, stirring constantly until completely smooth and combined.
Remove from heat and stir in 1 1/4 cups sugar until fully incorporated.
In a separate bowl, whisk together 3 eggs, 1 teaspoon vanilla extract, and 3 tablespoons vegetable oil, then add this mixture to the chocolate along with 2/3 cup cocoa powder and 1/4 teaspoon salt, stirring until no streaks remain.
Finally, fold in 1/2 cup flour with just a few strokes—don’t overmix, as this keeps the brownies fudgy rather than cakey.
Step 3: Bake the Brownies
- brownie batter from Step 2
Pour the brownie batter from Step 2 into your prepared pan and smooth the top with a spatula.
Bake at 350°F for 27-32 minutes—they should be set on the edges but still slightly jiggly in the center, which means they’ll stay moist and fudgy.
Remove from the oven and let cool completely to room temperature before assembling the tiramisu layers.
Step 4: Prepare the Mascarpone Cream
- 9 oz cold mascarpone cheese
- 1/2 cup powdered sugar
- 1.5 tsp vanilla extract
- 1 1/4 cups heavy cream
While the brownies cool, beat 9 oz cold mascarpone cheese with 1/2 cup powdered sugar and 1.5 teaspoons vanilla extract on medium speed until smooth and creamy—don’t overmix or the mascarpone can become grainy.
I like to use cold mascarpone straight from the fridge because it holds its texture better during whipping.
Slowly add 1 1/4 cups heavy cream while mixing, then increase speed to high and whip for 1-2 minutes until stiff peaks form.
This creates that luxurious tiramisu texture that’s both creamy and light.
Step 5: Assemble the Tiramisu Brownies
- 12 ladyfingers
- espresso dip from Step 1
- mascarpone cream from Step 4
Once the brownies from Step 3 are cooled, quickly dip each of the 12 ladyfingers into the cooled espresso mixture from Step 1 for just 1 second per side—a quick dunk is key to keep them from becoming soggy or falling apart.
Arrange the dipped ladyfingers in a single layer on top of the brownies, then spread the mascarpone cream from Step 4 evenly over them in a thick, generous layer.
Step 6: Chill and Finish
- 1 tbsp cocoa powder
Refrigerate the assembled tiramisu brownies for at least 1 hour so the flavors meld and the cream sets up nicely.
Just before serving, dust the top generously with 1 tablespoon cocoa powder using a fine sieve or sifter for an even coating.
Slice into squares and serve chilled.
Classic Tiramisu Brownies
Ingredients
Method
- Preheat your oven to 350°F and line an 8x8 or 9x9 inch baking pan with parchment paper. While the oven heats, prepare the espresso dipping liquid by combining 2/3 cup boiling water, 1.5 tablespoons espresso powder, and 1 tablespoon sugar in a small bowl, stirring until the espresso and sugar dissolve completely. Set aside to cool to room temperature—this needs to be cool before dipping the ladyfingers or they'll fall apart.
- Melt 1/2 cup butter in a pot over medium heat, then add 7 oz semi-sweet chocolate and 1 tablespoon espresso powder, stirring constantly until completely smooth and combined. Remove from heat and stir in 1 1/4 cups sugar until fully incorporated. In a separate bowl, whisk together 3 eggs, 1 teaspoon vanilla extract, and 3 tablespoons vegetable oil, then add this mixture to the chocolate along with 2/3 cup cocoa powder and 1/4 teaspoon salt, stirring until no streaks remain. Finally, fold in 1/2 cup flour with just a few strokes—don't overmix, as this keeps the brownies fudgy rather than cakey.
- Pour the brownie batter from Step 2 into your prepared pan and smooth the top with a spatula. Bake at 350°F for 27-32 minutes—they should be set on the edges but still slightly jiggly in the center, which means they'll stay moist and fudgy. Remove from the oven and let cool completely to room temperature before assembling the tiramisu layers.
- While the brownies cool, beat 9 oz cold mascarpone cheese with 1/2 cup powdered sugar and 1.5 teaspoons vanilla extract on medium speed until smooth and creamy—don't overmix or the mascarpone can become grainy. I like to use cold mascarpone straight from the fridge because it holds its texture better during whipping. Slowly add 1 1/4 cups heavy cream while mixing, then increase speed to high and whip for 1-2 minutes until stiff peaks form. This creates that luxurious tiramisu texture that's both creamy and light.
- Once the brownies from Step 3 are cooled, quickly dip each of the 12 ladyfingers into the cooled espresso mixture from Step 1 for just 1 second per side—a quick dunk is key to keep them from becoming soggy or falling apart. Arrange the dipped ladyfingers in a single layer on top of the brownies, then spread the mascarpone cream from Step 4 evenly over them in a thick, generous layer.
- Refrigerate the assembled tiramisu brownies for at least 1 hour so the flavors meld and the cream sets up nicely. Just before serving, dust the top generously with 1 tablespoon cocoa powder using a fine sieve or sifter for an even coating. Slice into squares and serve chilled.