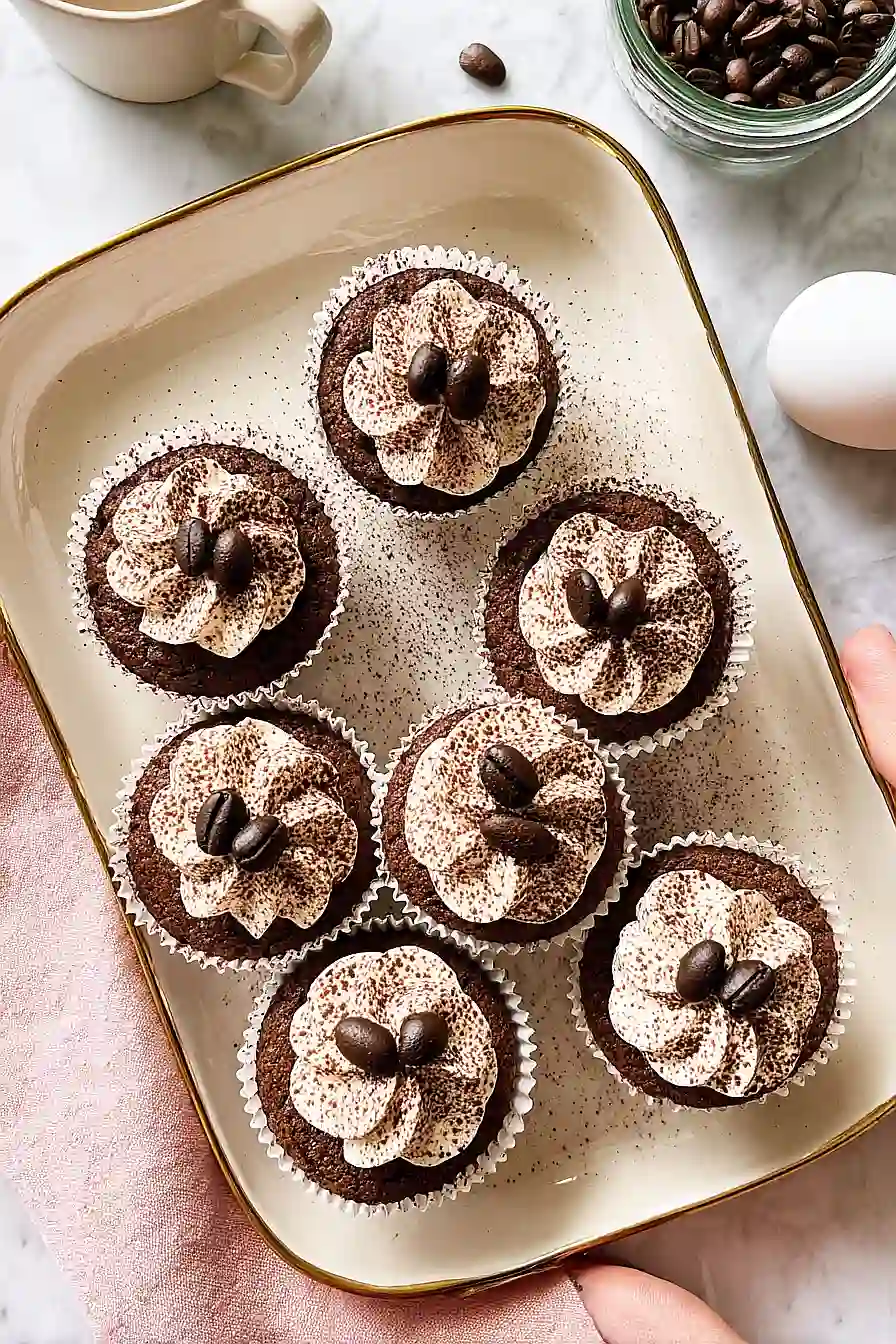
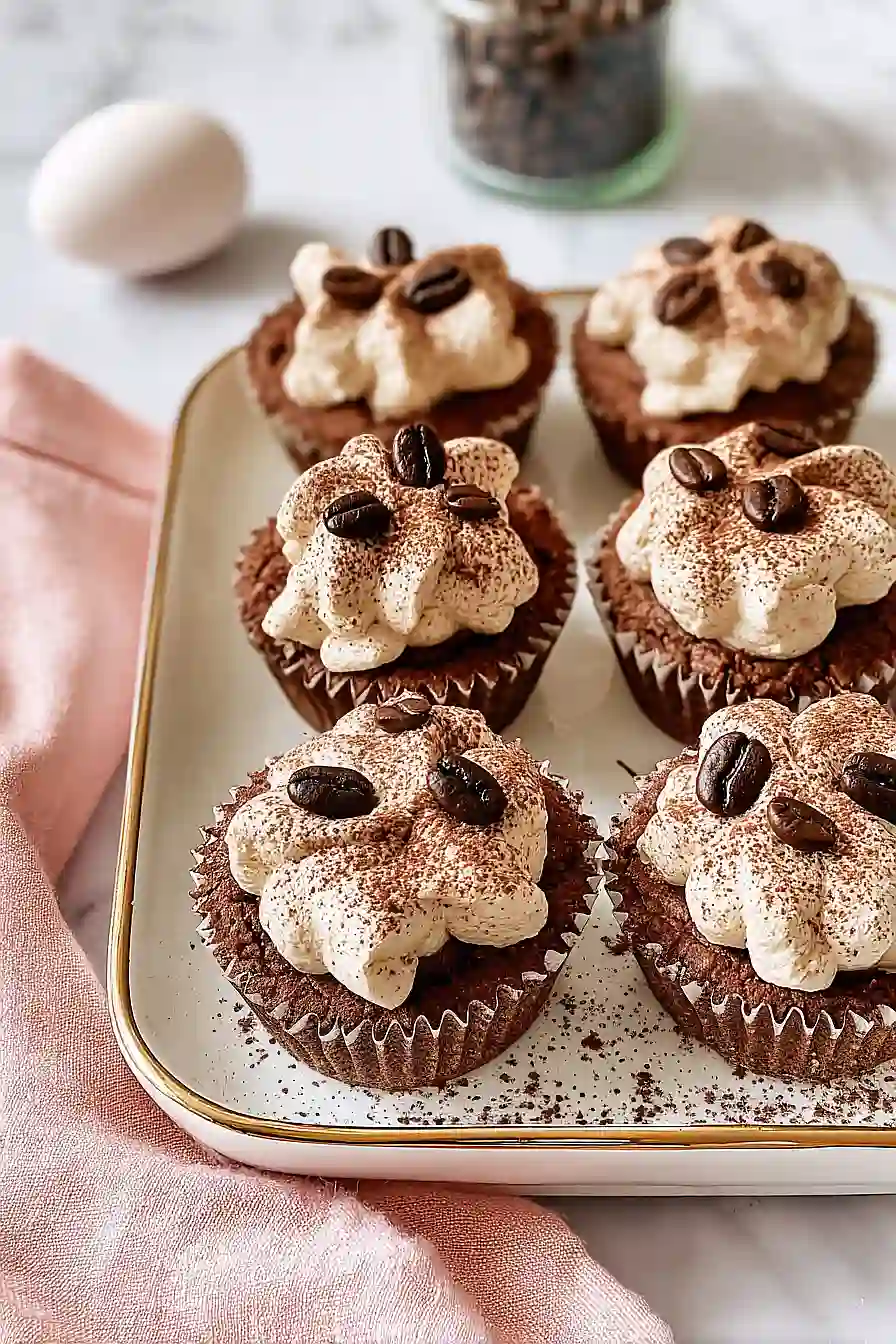
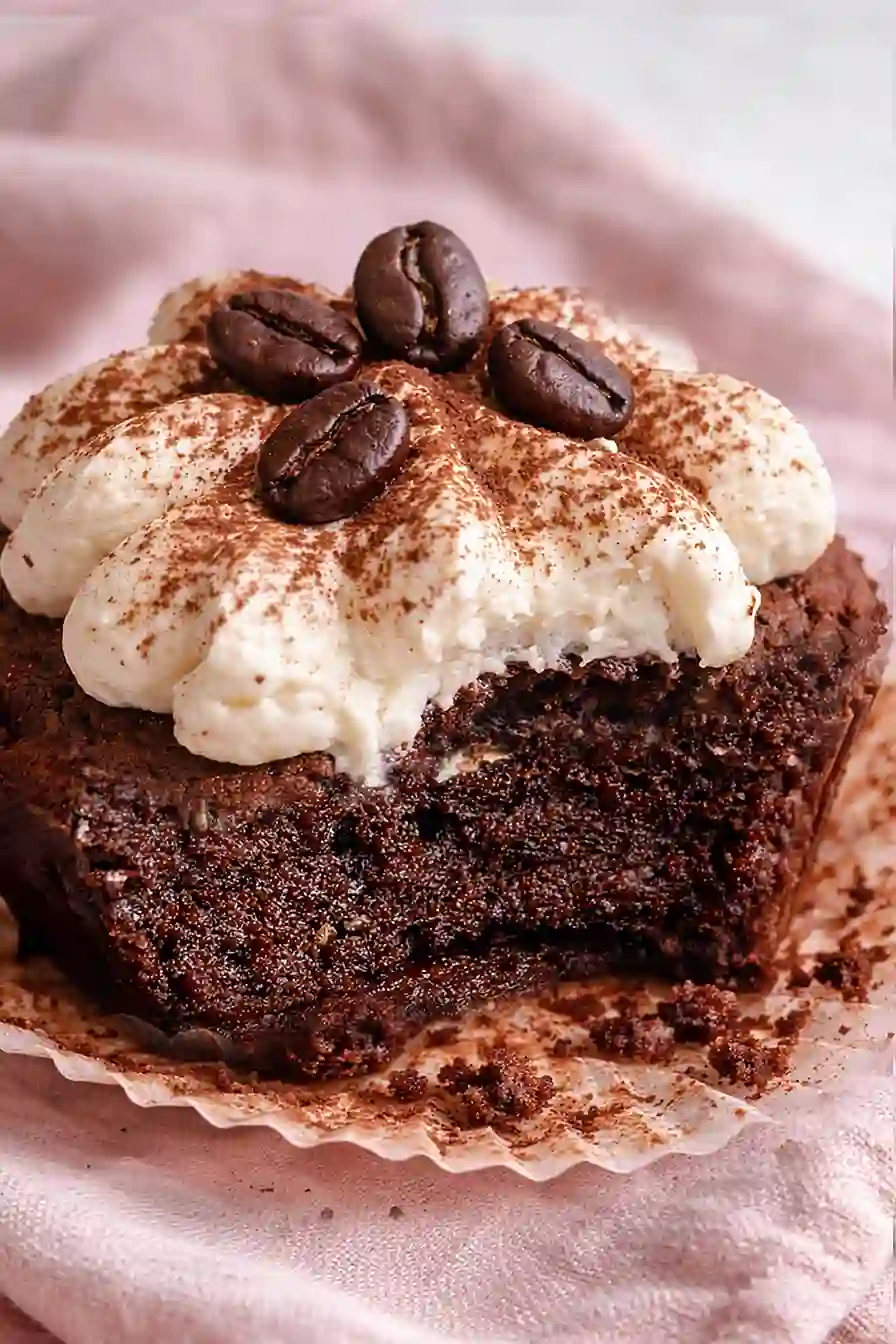
Here is my favorite tiramisu brownie cup recipe, with a rich, fudgy chocolate brownie base made with dark chocolate and coffee, topped with a creamy mascarpone whipped cream.
These brownie cups are the dessert I make when I want to impress without spending hours in the kitchen. They combine two desserts everyone loves, and they’re gone within minutes every single time I serve them.
Why You’ll Love These Tiramisu Brownie Cups
- Two desserts in one – You get the fudgy richness of brownies combined with the creamy, coffee-flavored goodness of tiramisu all in one bite.
- Perfect portion control – These individual cups make serving easy and look impressive when you bring them to the table, plus no messy slicing required.
- Ready in under an hour – From start to finish, you can have these elegant desserts done in about 45-60 minutes, making them doable even on busy weeknights.
- Great for entertaining – They look fancy enough for dinner parties but are simple enough that you won’t stress in the kitchen while your guests are over.
What Kind of Chocolate Should I Use?
For these tiramisu brownie cups, you’ll want to use good quality chocolate since it’s a main flavor component. Semi-sweet or dark chocolate (around 60-70% cocoa) works best because it balances nicely with the sweetness from the sugars and the creamy mascarpone topping. You can use chocolate chips in a pinch, but a chopped chocolate bar will melt more smoothly and give you a better texture. Avoid using unsweetened baking chocolate here since the recipe is already calling for cocoa powder and you don’t want your brownies to taste too bitter.
Options for Substitutions
Here are some swaps you can make if you’re missing a few ingredients:
- Mascarpone: This is really the star of tiramisu, so I’d try to stick with it if possible. But if you can’t find it, mix equal parts cream cheese and heavy cream until smooth – it won’t be quite the same, but it’ll work in a pinch.
- Chocolate: Any good quality dark or semi-sweet chocolate works here. You can use chocolate chips if that’s what you have, though bar chocolate melts a bit smoother.
- Butter: You can swap this with coconut oil for a dairy-free version, but use the same amount and make sure it’s in solid form before melting.
- Brown sugar: If you only have white sugar, use that instead – you’ll lose a tiny bit of moisture and molasses flavor, but the brownies will still turn out great.
- Coffee: Instant espresso powder mixed with water works perfectly, or use strong brewed coffee. In a pinch, you could skip it, but coffee really brings out the chocolate flavor.
- Heavy cream: For the topping, you could use whipping cream instead. Just make sure it has at least 30% fat content so it whips up properly.
Watch Out for These Mistakes While Baking
The biggest mistake when making these brownie cups is overbaking them – you want the centers slightly underdone when they come out of the oven, so pull them at 20 minutes and check with a toothpick that should come out with a few moist crumbs, not completely clean.
Another common error is trying to press the centers down while the brownies are too hot, which can cause them to crumble and fall apart, so wait until they’re warm but not piping hot from the oven.
When making the mascarpone filling, be careful not to overmix once you add the cream – stop as soon as it reaches a thick, spreadable consistency, because overwhipping can make it grainy and separated.
Finally, make sure your melted chocolate isn’t too hot when you add it to the butter mixture, or it could scramble the eggs when you mix them in later.
What to Serve With Tiramisu Brownie Cups?
These brownie cups are pretty rich and decadent on their own, so I like to serve them with a hot cup of espresso or strong coffee to balance out the sweetness. A scoop of vanilla ice cream on the side is always a good idea if you want to go all out for dessert night. Fresh berries like raspberries or strawberries add a nice tart contrast to the chocolate and coffee flavors, plus they look pretty on the plate. You could also serve them with a dollop of whipped cream dusted with cocoa powder, or even a small glass of dessert wine like Marsala if you’re feeling fancy.
Storage Instructions
Store: Keep your tiramisu brownie cups covered in the fridge since they have that creamy mascarpone topping. They’ll stay fresh for about 3-4 days in an airtight container. The brownie base actually gets a bit fudgier after a day or two, which I think makes them even better!
Freeze: You can freeze these for up to a month if you want to make them ahead for a party. Just wrap each cup individually in plastic wrap, then place them in a freezer bag. Thaw them overnight in the fridge before serving.
Serve: These are best enjoyed cold straight from the fridge. If you froze them, let them sit at room temperature for about 10 minutes before eating so the brownie softens up a bit. You can dust a little extra cocoa powder on top right before serving to freshen them up.
| Preparation Time | 25-35 minutes |
| Cooking Time | 20-25 minutes |
| Total Time | 45-60 minutes |
| Level of Difficulty | Medium |
| Servings | 12 brownie cups |
Estimated Nutrition
Estimated nutrition for the whole recipe (without optional ingredients):
- Calories: 3200-3500
- Protein: 35-40 g
- Fat: 225-250 g
- Carbohydrates: 300-325 g
Ingredients
For the brownie cups:
- 4 oz dark chocolate (I prefer Ghirardelli bittersweet 60% cacao bars)
- 6.5 oz butter (melted and cooled to room temperature)
- 1/2 cup brown sugar
- 1/2 cup sugar
- 2 tbsp coffee
- 2 eggs (room temperature, about 70
f) - 3/4 cup flour (I always use King Arthur all-purpose flour)
- 1/4 cup cocoa powder (sifted to remove lumps)
- 1/8 tsp salt
For the tiramisu topping:
- 8 oz mascarpone (I use Galbani brand for better texture and moisture)
- 6 fl oz heavy cream (cold, whipped until stiff peaks form)
- 1/2 cup powdered sugar
- 1/4 tsp vanilla extract
Step 1: Prepare Mise en Place and Preheat Oven
- 4 oz dark chocolate, chopped
- 3/4 cup flour
- 1/4 cup cocoa powder, sifted
- 1/8 tsp salt
Preheat your oven to 180°C (350°F) and line a muffin tin with paper liners.
Chop the dark chocolate into small, uniform pieces to ensure even melting.
Sift the cocoa powder into a small bowl to remove any lumps—this prevents bitter clumps in your final brownie.
Measure out all remaining dry ingredients (flour and salt) into another bowl.
Ensure your eggs are at room temperature, as they’ll incorporate more smoothly into the batter and create a better texture.
Step 2: Melt Chocolate and Create the Brownie Base
- 4 oz dark chocolate, melted
- 6.5 oz butter, melted and cooled
- 1/2 cup brown sugar
- 1/2 cup sugar
- 2 tbsp coffee
Melt the chopped chocolate using either a microwave (in 30-second intervals, stirring between each) or a double boiler over simmering water—avoid getting any water into the chocolate or it will seize.
Once melted and smooth, set aside to cool slightly.
In a separate bowl, whisk together the melted butter, coffee, brown sugar, and sugar for 3-5 minutes until the mixture becomes light and slightly fluffy.
This aerates the batter and helps create a fudgy brownie texture.
I like to use freshly brewed espresso or very strong cooled coffee rather than instant—it adds a deeper, more authentic coffee note.
Step 3: Build the Brownie Batter
- butter-sugar mixture from Step 2
- 2 eggs, room temperature
- melted chocolate from Step 2
- dry ingredient mixture from Step 1
Add the room-temperature eggs to the butter-sugar mixture one at a time, stirring well after each addition to fully incorporate.
This gradual approach prevents the batter from breaking and ensures a smooth, homogeneous texture.
Pour in the melted chocolate and stir until completely combined and uniform in color.
Gently fold in the dry ingredient mixture from Step 1 (flour, salt, and cocoa powder) until just combined—overmixing develops gluten and creates a tough brownie rather than a fudgy one.
Step 4: Bake the Brownie Cups
- brownie batter from Step 3
Divide the batter evenly among the lined muffin cups, filling each about three-quarters full.
Bake for 20-25 minutes at 180°C (350°F) until the tops are set but the centers still have a slight jiggle when you gently shake the tin—this indicates fudgy, moist brownies rather than cakey ones.
Remove from the oven and let cool for 2-3 minutes.
While still warm, gently press the center of each brownie with the back of a spoon to create a shallow well or cup shape for the tiramisu filling.
Step 5: Prepare the Tiramisu Mascarpone Cream
- 8 oz mascarpone
- 1/2 cup powdered sugar
- 6 fl oz heavy cream, whipped to stiff peaks
- 1/4 tsp vanilla extract
While the brownies cool completely to room temperature, prepare the tiramisu topping.
In a medium bowl, whisk together the mascarpone and powdered sugar until smooth and well combined—I use Galbani brand mascarpone because it has better texture and moisture content than some other brands.
In a separate chilled bowl, whip the cold heavy cream to stiff peaks.
Gently fold the whipped cream into the mascarpone mixture along with the vanilla extract, being careful not to deflate the cream.
The result should be light, fluffy, and able to hold its shape.
Step 6: Assemble and Finish
- cooled brownie cups from Step 4
- tiramisu mascarpone cream from Step 5
- cocoa powder for dusting
Once the brownie cups have cooled completely, spoon or pipe the tiramisu mascarpone cream from Step 5 generously into the wells of each brownie.
For a traditional tiramisu presentation, dust the tops with a light coating of additional cocoa powder just before serving.
Serve at room temperature or chilled, depending on your preference—I prefer them slightly chilled as it sets the cream and makes each bite more defined.
Easy Tiramisu Brownie Cup
Ingredients
Method
- Preheat your oven to 180°C (350°F) and line a muffin tin with paper liners. Chop the dark chocolate into small, uniform pieces to ensure even melting. Sift the cocoa powder into a small bowl to remove any lumps—this prevents bitter clumps in your final brownie. Measure out all remaining dry ingredients (flour and salt) into another bowl. Ensure your eggs are at room temperature, as they'll incorporate more smoothly into the batter and create a better texture.
- Melt the chopped chocolate using either a microwave (in 30-second intervals, stirring between each) or a double boiler over simmering water—avoid getting any water into the chocolate or it will seize. Once melted and smooth, set aside to cool slightly. In a separate bowl, whisk together the melted butter, coffee, brown sugar, and sugar for 3-5 minutes until the mixture becomes light and slightly fluffy. This aerates the batter and helps create a fudgy brownie texture. I like to use freshly brewed espresso or very strong cooled coffee rather than instant—it adds a deeper, more authentic coffee note.
- Add the room-temperature eggs to the butter-sugar mixture one at a time, stirring well after each addition to fully incorporate. This gradual approach prevents the batter from breaking and ensures a smooth, homogeneous texture. Pour in the melted chocolate and stir until completely combined and uniform in color. Gently fold in the dry ingredient mixture from Step 1 (flour, salt, and cocoa powder) until just combined—overmixing develops gluten and creates a tough brownie rather than a fudgy one.
- Divide the batter evenly among the lined muffin cups, filling each about three-quarters full. Bake for 20-25 minutes at 180°C (350°F) until the tops are set but the centers still have a slight jiggle when you gently shake the tin—this indicates fudgy, moist brownies rather than cakey ones. Remove from the oven and let cool for 2-3 minutes. While still warm, gently press the center of each brownie with the back of a spoon to create a shallow well or cup shape for the tiramisu filling.
- While the brownies cool completely to room temperature, prepare the tiramisu topping. In a medium bowl, whisk together the mascarpone and powdered sugar until smooth and well combined—I use Galbani brand mascarpone because it has better texture and moisture content than some other brands. In a separate chilled bowl, whip the cold heavy cream to stiff peaks. Gently fold the whipped cream into the mascarpone mixture along with the vanilla extract, being careful not to deflate the cream. The result should be light, fluffy, and able to hold its shape.
- Once the brownie cups have cooled completely, spoon or pipe the tiramisu mascarpone cream from Step 5 generously into the wells of each brownie. For a traditional tiramisu presentation, dust the tops with a light coating of additional cocoa powder just before serving. Serve at room temperature or chilled, depending on your preference—I prefer them slightly chilled as it sets the cream and makes each bite more defined.